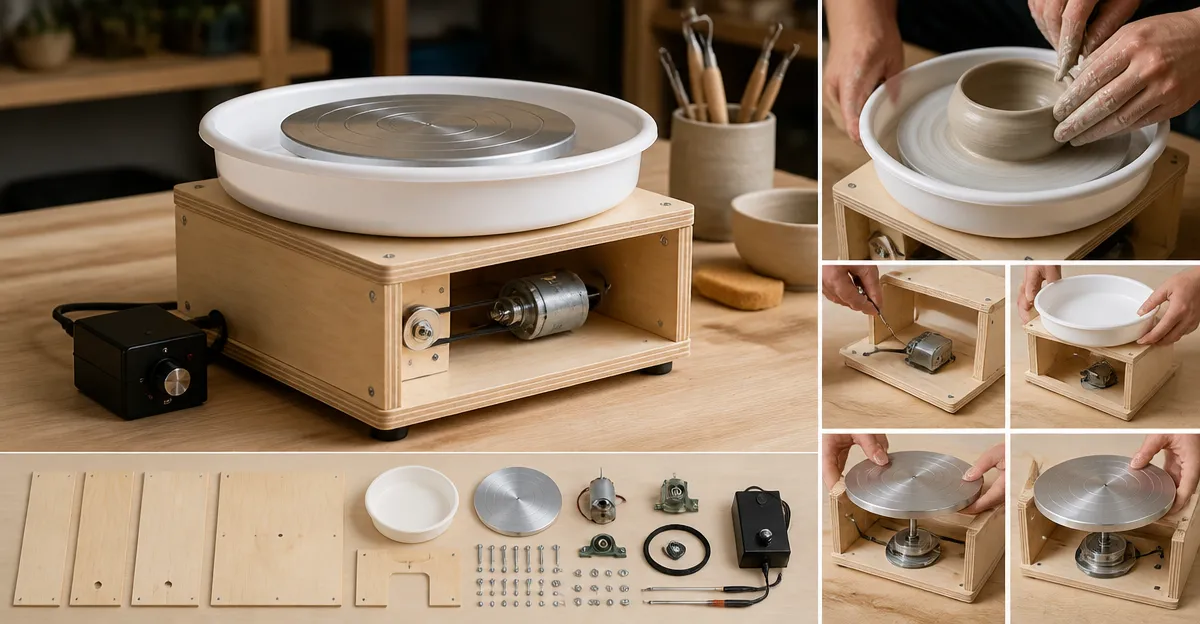
How to Build a DIY Mini Pottery Wheel: Complete Build Plans & Step-by-Step Guide
Introduction
The reader will discover how to assemble a compact, reliable pottery wheel that fits on a tabletop, enabling the creation of mugs, bowls, and decorative vessels without the expense of a full‑size studio system. This guide explains each construction phase, highlights essential tools, and offers practical advice for achieving a smooth, wobble‑free rotation. By following the instructions, one can enjoy a professional‑grade experience while keeping the budget modest. The value of a DIY wheel lies in its customizability, portability, and the satisfaction of building a creative instrument from scratch.
What You'll Need
- Motor and wheel assembly – recommended VEVOR 14" Pottery Wheel or VEVOR 11" Pottery Wheel
- Base material – sturdy plywood or MDF, 3/4‑inch thickness
- Adjustable lift mechanism – steel threaded rods and lock nuts
- Power switch and wiring – rated for 120 V, 350 W to 450 W motor
- Tool kit – screwdrivers, drill, wrenches, sandpaper, and a level
- Optional compact alternatives – Insnug Mini Pottery Wheel or Alldeer Mini Pottery Wheel for pre‑assembled solutions
Step 1: Design the Base Frame
The base must support the motor, wheel, and lift mechanism while remaining level under load. Begin by measuring the wheel's footprint; the VEVOR 14" wheel requires a platform at least 16 inches square to allow clearance for the splash basin. Cut a 3/4‑inch plywood sheet to 18 × 18 inches, then sand the edges to prevent splinters. Attach four 2‑inch wooden legs using pocket holes, ensuring each leg is precisely 30 cm long to provide a comfortable working height for most users.
Why a sturdy plywood base matters: a rigid platform eliminates vibration that can translate into wobble, a common complaint among beginner wheel owners. The VEVOR wheels feature a triangular heavy‑duty base that already reduces shaking; a solid wooden frame complements this design and extends stability to the DIY version.
Step 2: Install the Motor and Wheel Assembly
Secure the motor housing to the center of the base using the pre‑drilled mounting holes supplied with the wheel kit. For the VEVOR 14" model, the 450 W brushless motor delivers 60‑300 rpm with a low 60 dB noise floor, making it suitable for home studios where quiet operation is essential. Align the wheel head with the motor shaft, then tighten the coupling bolt to prevent slippage during high‑speed throwing.
When using the VEVOR 11" wheel, the 350 W motor provides comparable speed range while being slightly lighter, which can be advantageous for a portable mini setup. Both wheels include a waterproof LCD control panel; connecting the panel to the motor ensures precise speed adjustments via foot pedal or hand control, a feature that enhances ergonomic comfort during long sessions.
Step 3: Build the Adjustable Lift‑Top Mechanism
Fabricate a lift column using a 1‑inch stainless‑steel threaded rod that passes through a bearing block attached to the wheel’s underside. Install lock nuts at the top and bottom of the rod to allow fine height adjustments from 0 to 2 inches for the 14" wheel, or up to 6 inches for the 11" version. This range accommodates users of varying stature and enables a seated or standing working position.
The lift design mirrors the VEVOR wheels' own flexible lift‑top, which has been praised for its ease of use. By replicating this mechanism, one gains the same ergonomic benefits without purchasing an expensive commercial unit. Remember to lubricate the threads with a light oil to ensure smooth movement and to prevent wear.
Step 4: Attach the Splash Basin and Safety Features
Position the detachable ABS water basin directly beneath the wheel head. The basin captures excess water and clay, protecting the floor and simplifying cleanup. Secure the basin with the provided clamps, and verify that the drainage opening aligns with the wheel's splash guard.
Safety is paramount; connect the motor to a grounded three‑wire outlet and install the earth‑leakage protection device included with the VEVOR wheels. This device interrupts power in the event of a short circuit, safeguarding the user and extending the lifespan of the equipment. Reinforced rubber pads on the base further reduce floor scratches and improve grip.
Step 5: Wire the Power Switch and Foot Pedal
Mount a toggle switch on the side of the base, routing the live wire through a conduit to keep it out of the splash area. Connect the foot pedal to the control panel using the supplied cable; the pedal offers hands‑free speed modulation, allowing the potter to focus on shaping the clay. Test the circuit by turning the switch on and verifying that the LCD panel lights up and the wheel spins at low speed.
Choosing a quality foot pedal, such as the one supplied with the VEVOR 14" wheel, provides a durable, water‑resistant interface. The pedal’s plastic construction is lightweight yet robust, and it integrates seamlessly with the wheel's electronic control system, eliminating the need for aftermarket adapters.
Step 6: Calibrate Speed and Direction
Power on the wheel and use the LCD panel to select clockwise or counter‑clockwise rotation, depending on the potter's dominant hand. Adjust the speed to a low setting (approximately 60 rpm) for centering the clay, then increase to 150‑200 rpm for pulling walls. Record the optimal settings for the specific clay type being used, as air‑dry clay behaves differently from stoneware.
Both VEVOR models allow speed changes via foot pedal, which offers finer control than manual knob adjustments. This capability is especially useful when transitioning from a slow centering phase to a faster wall‑building phase, ensuring consistent wall thickness and reducing the risk of collapse.
Tips & Pro Tips
- Level the base with a carpenter's level before each session; an uneven platform is the most common cause of wobble.
- Apply a thin layer of silicone grease to the wheel head bearing to minimise friction and extend bearing life.
- Use the included stainless‑steel tools from the VEVOR wheel kit for trimming and shaping; they are harder than the typical plastic tools found in cheaper kits.
- For beginners, practice with 2‑lb clay balls; this weight is easy to center and reduces strain on the motor.
- Store the wheel in a dry environment; moisture intrusion can damage the electronic panel, a problem reported by users of lower‑quality wheels.
Troubleshooting
| Problem | Possible Cause | Solution |
|---|---|---|
| Wheel wobbles during operation | Base not level or legs loose | Re‑tighten leg bolts, place a level on the wheel head, add shims if necessary. |
| Motor does not start | Improper wiring or tripped earth‑leakage protection | Check connections, reset the protection device, verify outlet voltage. |
| Speed control unresponsive | Foot pedal cable damaged | Replace the pedal cable using the spare provided in the kit. |
| Excessive noise above 60 dB | Loose motor mounting | Secure motor bolts and add vibration‑absorbing pads beneath the base. |
Conclusion
The reader now possesses a complete set of instructions to construct a functional mini pottery wheel, select appropriate components, and maintain optimal performance. By integrating a high‑quality motor such as the VEVOR 14" or 11" wheel, the DIY build achieves professional speed control, low noise, and ergonomic adjustability. The guide also provides troubleshooting strategies to address common issues, ensuring a smooth creative experience for both novices and experienced potters.
With the completed wheel, one can explore the art of throwing, experiment with different clay bodies, and produce functional ceramics without the overhead of a full studio. The satisfaction of building one's own tool adds an extra layer of pride to every finished piece.
Products Mentioned in This Guide
Frequently Asked Questions
What basic materials are needed to build a DIY mini pottery wheel?
You need a motor and wheel assembly, a sturdy 3/4‑inch plywood or MDF base, steel threaded rods with lock nuts for the lift, and basic hardware like screws and bearings.
Can I use a different motor than the recommended VEVOR wheels?
Yes, any motor that provides consistent low‑speed torque (around 30‑60 RPM) and can be mounted securely will work, but you may need to adjust the speed controller.
How do I ensure the wheel rotates without wobbling?
Mount the motor centrally, use a balanced wheel disc, and tighten all fasteners; adding a rubber or felt pad between the base and wheel helps damp vibration.
Is a speed controller necessary for a mini pottery wheel?
A variable speed controller is recommended to fine‑tune rotation speed for different projects and to start/stop smoothly.
What safety precautions should I follow while building the wheel?
Secure the base to a stable surface, keep wiring away from moving parts, and wear eye protection when drilling or cutting the base.