How to Set Up a Mini Pottery Wheel in a Small Apartment: Step-by-Step, Low-Mess & Space-Saving Guide
Introduction
Living in a small apartment does not mean one must forgo the joy of pottery. This guide will teach readers how to select, assemble, and operate a mini pottery wheel while preserving limited floor space and minimizing cleanup. By following the instructions, one can create functional bowls, decorative vases, and therapeutic art without disturbing neighbors or cluttering a modest living area. The information is valuable for beginners, hobbyists, and families who seek a creative outlet that fits into a compact environment.
What You’ll Need
- Mini pottery wheel (recommended models are listed in the “Products Mentioned” section)
- Small work surface or sturdy table
- Water basin or removable splash tray
- Air‑dry clay or preferred clay type
- Basic sculpting tools (carving tools, wooden tools, sponge)
- Cleaning cloths and a bucket for water
- Optional: foot pedal for hands‑free speed control
Step 1: Choose the Right Mini Pottery Wheel
Selecting a wheel that matches the size of the apartment and the skill level of the user is crucial. The VEVOR Mini Pottery Wheel offers a compact footprint, dual turntables, and speed adjustment from 0‑320 RPM, making it ideal for children and adults who need a quiet (<55 dB) and portable solution. Priced at $33.29 with a 4.1‑star rating from 151 reviews, it provides a complete 18‑piece accessory set, including carving tools and a waterproof apron, which reduces the need for additional purchases. For users who prefer a slightly larger turntable and a richer accessory bundle, the Alldeer Mini Pottery Wheel features a 6‑inch metal turntable, two‑way rotation, and an all‑in‑one kit with paints, brushes, and air‑dry clay for $59.99 and a 4.3‑star rating from 229 reviews. If a foot pedal is desired for hands‑free speed modulation, consider the Alldeer Pottery Wheel with Foot Pedal, which combines a 4.7‑inch turntable with a responsive pedal for $47.99 and a 4‑star rating from 262 reviews. Adults seeking a more robust setup may opt for the Insnug Pottery Wheel Kit, offering a 6‑inch metal turntable, dual‑direction control, and a full suite of tools for $60.77 with a 4.2‑star rating from 1,299 reviews. Finally, for a kid‑focused, mess‑free experience, the Make It Real Mini Pottery Studio provides a USB‑powered studio, centering tool, and ten guided projects for $19.99 and a 4.5‑star rating from 877 reviews. Choose the wheel that aligns with budget, space, and user age.
Step 2: Prepare a Dedicated, Space‑Saving Work Area
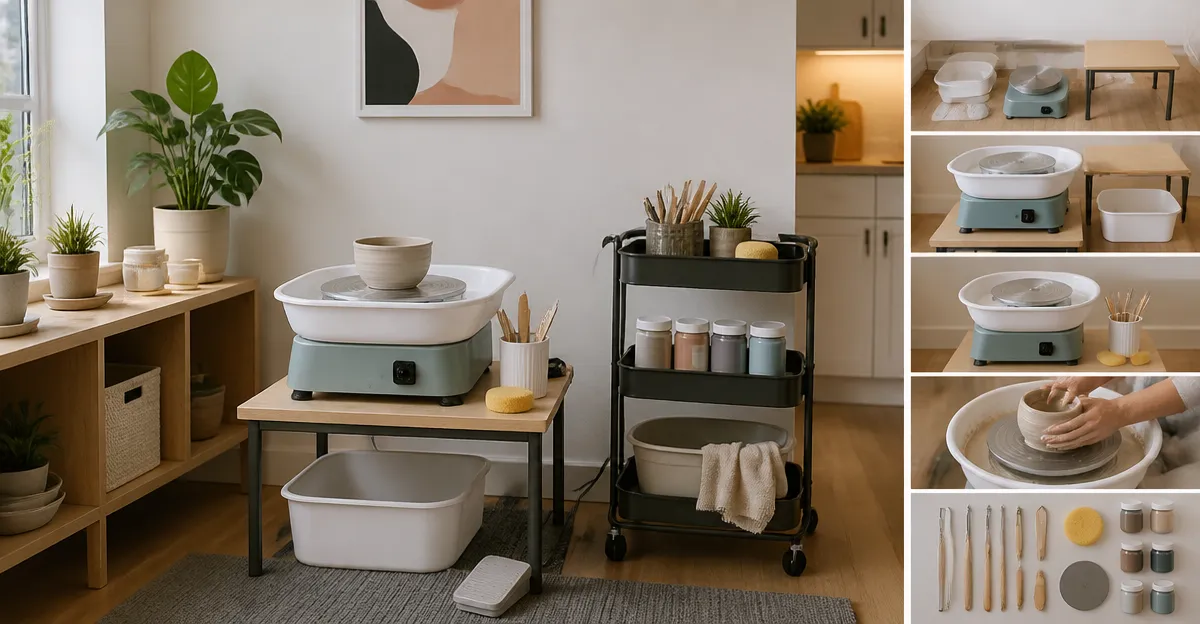
Identify a flat surface that can support the wheel’s weight and allow room for a splash tray on one side and a storage bin on the other. A folding table that can be tucked against a wall after use is ideal because it eliminates permanent furniture clutter. Place a thin rubber mat or a folded towel beneath the wheel to protect the floor from water spills and to reduce vibration noise. Keep a small bucket or collapsible water container nearby for quick rinsing of tools, ensuring that the water does not accumulate on the floor.
Step 3: Assemble the Wheel and Attach the Splash Tray
Follow the manufacturer’s instructions to attach the motor base to the turntable; most mini wheels use a simple screw‑less clip system for quick assembly. For the VEVOR Mini Pottery Wheel, the removable water basin snaps into place, allowing easy cleaning and preventing water from entering the motor housing. Secure the splash tray by aligning the built‑in slots and pressing firmly until it clicks, ensuring a watertight seal. Verify that the speed dial or foot pedal (if using the Alldeer model with pedal) responds smoothly before loading any clay.
Step 4: Organize Tools Within Arm’s Reach
Arrange the included sculpting tools in a small tray or a portable toolbox so they are accessible without leaving the work surface. The Alldeer Mini Pottery Wheel provides 18 pieces, including plastic shaping tools, wooden tools, and a metal scraper; grouping them by function (cutting, shaping, smoothing) speeds up workflow. For the Alldeer Wheel with Foot Pedal, keep the foot pedal on the floor beside the wheel, and place the power adapter on a stable edge to avoid accidental pulls. A small zip‑lock bag can hold spare clay blocks, preventing them from drying out.
Step 5: Condition the Clay and Center It on the Wheel
Begin by kneading the air‑dry clay until it feels pliable; this process, called wedging, removes air bubbles and creates a uniform texture. Place a ball of clay on the center of the turntable, press the foot pedal lightly (or turn the speed dial) to a low RPM, and use both hands to gently shape the ball into a cone. The centering tool included in the Make It Real Mini Pottery Studio helps maintain a steady axis, reducing the learning curve for beginners. Once the clay is centered, increase speed gradually to 100‑150 RPM for the initial throw, keeping hands steady to avoid wobble.
Step 6: Execute Your First Throw
With the wheel spinning at a comfortable speed, use your thumbs to open the center of the clay while applying gentle pressure outward with your fingers. Slowly pull the walls upward, shaping the piece into a cylinder or bowl; the VEVOR wheel’s speed range up to 320 RPM provides enough power for small projects without overwhelming novice users. For left‑handed creators, the two‑way rotation on the Insnug Pottery Wheel Kit allows a simple switch of direction, making the process ergonomic. After shaping, use the included wooden tools to refine the rim and add decorative details. Finally, turn off the wheel, remove the piece, and place it on a drying rack or a clean towel.
Step 7: Clean Up Efficiently to Keep Mess Low
Immediately rinse the splash tray and water basin with a damp cloth; the removable design of the VEVOR and Insnug models makes this step quick and prevents clay buildup. Wipe the turntable with a slightly damp sponge to remove residual clay, then dry it with a lint‑free towel. Store all tools in the original tray or a small organizer to keep the work area tidy. Because the wheels operate at low noise levels (≤55 dB for VEVOR, 60 dB for Insnug), neighbors are unlikely to be disturbed, preserving a peaceful apartment environment.
Tips & Pro Tips
- Use a lightweight, portable table. A folding table with a height of 28‑30 inches provides comfortable ergonomics without permanent space consumption.
- Maintain moderate clay weight. Most mini wheels handle up to 1 lb of clay comfortably; exceeding this can strain the motor and increase noise.
- Adjust speed gradually. Sudden jumps in RPM can cause the clay to slip, especially on smaller turntables.
- Employ the foot pedal for hands‑free control. The Alldeer foot pedal allows precise speed modulation while your hands remain on the clay.
- Store the wheel vertically. When not in use, tilt the wheel against a wall to free floor space; the compact design of the Make It Real Studio fits easily on a bookshelf.
- Use a small fan. Air‑dry clay dries faster with gentle airflow, reducing the time a piece occupies the work surface.
Troubleshooting
| Problem | Possible Cause | Solution |
|---|---|---|
| Wheel vibrates or wobbles | Uneven floor or loose base | Place a rubber mat beneath the wheel and tighten any base screws. |
| Motor makes grinding noise | Motor wear or debris | Turn off, unplug, and clean the motor vent; if noise persists, contact the seller (VEVOR offers responsive service). |
| Clay sticks to the turntable | Insufficient water or too much clay | Lightly mist the surface with water before centering; use less than 1 lb of clay per throw. |
| Foot pedal does not respond | Loose connection | Check the pedal cable for proper seating; replace if damaged. |
Conclusion
Setting up a mini pottery wheel in a small apartment is entirely feasible when one selects a compact, low‑noise model and follows a systematic, space‑saving workflow. By preparing a dedicated work surface, organizing tools, and practicing proper centering techniques, creators can enjoy low‑mess pottery sessions without sacrificing living space. The recommended products each address specific needs—whether it is affordability, foot‑pedal control, or a fully guided studio experience—ensuring that readers can make an informed purchase or simply use existing tools. Embrace the therapeutic benefits of pottery, and let the compact wheel become a centerpiece of creativity in even the tiniest home.
Products Mentioned in This Guide
Frequently Asked Questions
What size mini pottery wheel is best for a small apartment?
Choose a wheel with a compact footprint (under 12 inches wide) and a lightweight base that can sit on a folding table or desk.
How can I minimize noise from a mini pottery wheel to avoid disturbing neighbors?
Select a wheel with a quiet motor or belt‑drive system and use a rubber mat underneath to damp vibrations.
Do I need a separate splash tray or can I use a regular water basin?
A removable splash tray fits most mini wheels, but a shallow water basin works equally well and is easy to store when not in use.
What’s the easiest way to clean up after a pottery session in a tight space?
Wipe the wheel and tools with a damp cloth immediately, then rinse the basin and store excess water in a bucket to prevent spills.
Is a foot pedal necessary for controlling speed on a mini pottery wheel?
A foot pedal is optional; most beginners can manage speed with the hand‑controlled knob, but a pedal offers hands‑free precision once you’re comfortable.